Category Archives: Uncategorized

TEXAS! – finding the TINY in the “everything is bigger” state

Woah, what an amazing trip.

We’ve been back for a few days, but are just getting some time to reflect/catch up now that we are snowed in for the next few days thanks to this “nemo” storm we’re experiencing in MA right now (there’s a driving ban, so we couldn’t go anywhere even if we wanted to!).

TEXAS has more TINY going on than one might think, considering it’s the state known for the slogan, “Everything is Bigger…”. We had an incredible, inspiring time hanging out with the Engineering class at the Ann Richards School in Austin. Those girls are the coolest: they love math and science, the love engineering, and they were wise beyond their years. They were so engaged with their Project Ventura, they came in on Saturday and every day after school. I was super inspired by the work these girls were doing. We learned a lot from each other! You can all go check out their blog: http://projectventura.wordpress.com/. AND, you can help them out because their KICKSTARTER has just LAUNCHED! Please, please, please support these awesome girls by donating if you possibly can – they are the next generation of great innovators. I’ll keep reminding you throughout their campaign, but why wait? Go to their project page now, and donate some $!

Me (in the pink shirt), Matt on the other side, with the ARS class.

Me (in the pink shirt), Matt on the other side, with the ARS class.

In a moment of wonderful fulfillment of life-goals and awesomeness, I also got to talk extensively to the ARS AP Environmental class about radical menstruation (a topic some of you will not be surprised to learn I am very well-versed in and passionate about). It’s an all-girls school, so they were all interested, and they asked! It was the highlight of my life – at least for that moment. I think I had a lot of those moments with the ARS girls. But seriously, I hardly ever get a chance to change awesome young ladies’ lives, but by the end of that talk no one was going to use a tampon again!

I digress! While in TX, we also visited some other inspirational tiny house innovators. We hung out with Brad Kittel at Tiny Texas Houses for more than a few hours, which was wonderful. I filmed a great interview with this visionary man, so once that’s all edited you guys can see it. We also interviewed Garrett Finney – designer of the Cricket Trailer – a personal inspiration to me and the COMET. Right in Austin city limits, we visited and spoke with Tracen Gardner, the man behind the modular tiny house company Reclaimed Space. We’re working on editing all these interviews/tours now, hopefully they will be ready soon-ish! Tiny is becoming a big deal in Texas – and these are just a few of the leaders of this movement for smarter buildings.

Tagged , , , , , , , , , , ,

Installing the Fresh Water Tank Fill Spout

The fresh water tank (the only tank in the COMET – no grey or black water tanks) lives underneath the rear couch/bed. Originally it was under the dinette bench on the port side, but that meant that there was about 15 feet of tubing wrapping around the entire trailer to get from the tank to the faucet on the other side. We moved it to underneath the rear bench to be closer to the faucet. The fresh water tank is 15 gallons and I refill it about every 3-4 days. You don’t really use a lot of water when you have to pump it by hand. And the hot water is just one of those black bag camp showers that I hang up outside.

Here’s how we installed the new fresh water tank.

Here's where the new fresh water fill spout goes. Thanks Timbucktu RV Supply in Worcester for all the parts needed for the water tank installation!

Here’s where the new fresh water fill spout goes. Nothing is pressurized, so it’s just an angled spout where you put water form the hose. Thanks Timbucktu RV Supply in Worcester for all the parts needed for the water tank installation!

Close up of the fill. We caulked around the edges, and screwed it into the wall. The small spot to the left of the spout is the vent, which allows the tank to empty correctly.

Close up of the fill. We caulked around the edges, and screwed it into the wall. The small spot to the left of the spout is the vent, which allows the tank to empty correctly.

Here's what it looks like from the inside. We toe-nailed in a piece of plywood so that we would have something more than just aluminum to screw it into from the outside.

Here’s what it looks like from the inside. We toe-nailed in a piece of plywood so that we would have something more than just aluminum to screw it into from the outside.

Here are the lines attached, using hose clamps. The blue and white striped line (the larger one) is the water fill line, it goes from the fill spout to the tank. The clear, smaller line is the vent line for air to escape as the water drains. It goes from the tank to the spout, then outside via that vent.

Here are the lines attached, using hose clamps. The blue and white striped line (the larger one) is the water fill line, it goes from the fill spout to the tank. The clear, smaller line is the vent line for air to escape as the water drains. It goes from the tank to the spout, then outside via that vent. Don’t skimp on the caulking when you’re dealing with the water situation. Better safe than sorry!

Some context.

Some context.

The tank! It came with no pre-drilled holes, so we could decide where to put them ourselves. Using a hole saw bit on the drill, we cut out the correct holes for the hose attachments. There were 3 holes in the tank total: one for water to come in from the spout, one for air to escape when it's draining, and one for water to travel from the tank to the faucet via another line, which is down at the bottom.

The tank! It came with no pre-drilled holes, so we could decide where to put them ourselves. Using a hole saw bit on the drill, we cut out the correct holes for the hose attachments. There were 3 holes in the tank total: one for water to come in from the spout, one for air to escape when it’s draining, and one for water to travel from the tank to the faucet via another line, which is down at the bottom.

Then we cut the new panel for that wall (the old panel was all water damaged under the window and at the floor) and tacked it in.

Then we cut the new panel for that wall (the old panel was all water damaged under the window and at the floor) and tacked it in.

We then put in the framing and front of the rear bench (not tank yet) because we needed to see how we would run the line from the tank to the faucet and make sure everything would fit.

We then put in the framing and front of the rear bench (not tank yet) because we needed to see how we would run the line from the tank to the faucet and make sure everything would fit.

Now, we actually installed the kitchen before attaching the water tank and hooking everything up, so that’s where I’ll stop for now. Basically, the tank got put into it’s spot under the bench, it fit very snugly. We hooked up the fill line to the appropriate fitting that we had installed in the side of the tank, and the air vent line to the appropriate fitting. We put the fitting (barbed) into the bottom for the faucet line as well, but didn’t hook it up until the kitchen was finished. So we’ll look at the kitchen then get back to finishing up the water tank. Photos to come!

Tagged , , , , ,

Framing and Insulating the New Floor

Here I am again, trying to get us up to speed with where the COMET’s at now. This is from the Summer, so bear with me while the next few posts catch us up to the COMET’s current loveliness.

We left off where we had replaced some of the rotten framing in the walls and on the floor, and here you can see how we re-framed and insulated the floor. As I mentioned before, the entire rear half of the trailer had been demolished by carpenter ants, so we just started from scratch back there.


Image

This is how we re-framed the floor, with 2 x 4s where there had been 2 by’s. The lumber framing crosses over the steel frame of the trailer.

Image

Image

Image

New cross-members, tow-nailed in, for extra support. I wanted this floor to be much sturdier than the original one, which was merely stapled together.

Image

Those white dots on the pink aluminum sheet are where I caulked where the staples used to be. It’s not necessarily better to be airtight in the floor, because if any water does leak in from above, you want it to be able to escape and not pool in the floor (which will cause rot). But I didn’t want any water to come up from underneath the trailer during travel, so I sealed off the holes where the staples used to be.


INSULATION:

Image

This is the UltraTouch Denim insulation. What a joy to work with. So easy to use and you don’t have to wear a hazmat suit or worry about getting all itchy like with fiberglass. Thank you GreenBuildingSupply.com for donating the UltraTouch!

Image

Installation was a breeze. I either used the razor knife to cut the batts down to size, or just tore it to the right size with my hands.

Image

Image

Image

Image

That’s the little part near the door that needed replacing. I think that spot to the left of the doorway is a very common place to find water damage/rotted wood.

Image

And finally, we cut a new sub floor out of plywood and laid it down. Everything fit nicely. Under the back hatch, you can see a 2 x 6 on top of the plywood. That is the beginning of the framing for the rear wall, which you’ll see in the next post. Those two bolts that stick up out of the 2 x 6 at about 1/3 and 2/3 across are coming up from underneath the chassis. They are holding the metal trailer frame to the wooden camper frame.

Stay tuned for more progress! Hopefully soon we can have a grand unveiling of the finished interior! As always, thanks for reading 🙂

Tagged , , , , , , ,

A New Year, and a Winter Small Space Experiment

I can’t believe it’s been one year since I first launched cometcamper.wordpress.com, and since the COMET began to come to life after years of imagineering prior. I’m so grateful for all the help I’ve had along the way (yay, sponsors!) and all of the amazing people I have met as a result of the many places the COMET takes me.

Image

Now that it’s January, winter has officially arrived in Massachusetts. There’s a  few feet of snow on the ground, and it’s not going anywhere for a while. Confession time: I really wanted to live in the COMET over the winter this year, but I couldn’t get her weatherproofed in time. The hole in the wall where the fridge will end up going has a large vent, and without the fridge installed it was like sleeping outside! It ended up getting too chilly, and until I seal up the cracks and insulate the vents and install the fridge (and find an acceptable heat source) sadly I will not be sleeping in the COMET this winter. However, I took this opportunity to try on another tiny space living situation for fun and to see what I can learn from it.

While I’m not living in the COMET, I’ll be living in a tiny closet under the stairs in a collective house. The “room” is about the size of a twin bed, but the previous dweller made such good use of the space that it feels cozy, not cramped. There’s a bed on a platform so I can store things underneath. There are two drawers installed directly into the wall as built-ins at the foot of the bed. There is a desk that nests in the wall and unfolds when you need it, and the bed becomes your desk seat. She even installed a nifty bookcase tower. There’s also a tiny window on an exterior wall, so you can see outside and get some fresh air. I will have to post some pictures!

I enjoy living collectively and am looking forward to seeing how effective collective  and shared space can be. When you live in the closet, you spend time in the shared space more than someone in their own larger room. I anticipate making good use of the shared library and other common spaces. I wonder how a collective house of many tiny closet-sized rooms would function, if the collective space was ample? Something to think about! Anyway, it’s interesting to see how multi-functional a single room can be, and how comfortable a closet can be when it’s so efficiently and elegantly designed.


Tagged , , , , ,

Tiny House Design Build Recap, and Looking Ahead

I can’t believe it’s fall, for real it’s fall!

In Vermont, the leaves went from barely changed last week when I was there building a tiny house, to almost all fallen this past weekend when I was at Yestermorrow taking my final Sustainable Design/Build Certificate course, Super Insulation for Zero Energy Buildings. Got me thinking about building a super insulated tiny house. Tiny houses already use so little energy to heat (or cool, depending on where you are), but super insulation would be a great option for a tiny house that was on a foundation. Why spend money on heating fuel if you didn’t have to by designing your home this way? Very interesting stuff.


So here are a few more photos of the tiny house build at Yestermorrow from last week. I’m not going to go into great detail about how we built the house, because I still have so much to catch up on writing about the COMET’s progress and other things, but please ask questions if you have some burning things you want to know! Now I can officially say I’ve built a tiny house on wheels.


You can see the 4 x 4 supports that hold the house together and form the framing of the loft floor. TerraNova, the lovely lady from Boston that I met at the workshop, and hopefully a longtime tiny house buddy, is problem solving.

Here you can really see the loft framing and spacing of the 4 x 4s.

The rafters are up, and the gable ends are on. While people were working on the roof, I was on my back underneath the trailer, under both axles (yes, I was terrified) screwing the house into the trailer. But I’m used to rolling around under the chassis of a trailer, so I volunteered!

That’s me, in the pink scarf, scared to death nailing in the roof while Terra holds me up on the scaffolding. Thanks Terra!

We put on as much siding as we could by the end of the last day. We had installed all windows, all trim, decking on the porch, and a few other details. I think much of the exterior trim/siding was salvaged from Detroit.

What an awesome team! We did it! By the end of the day, we were all ready to eat some pizza baked in the earth-oven next to the Quonset hut.

Thanks Timothy for all of these pictures!


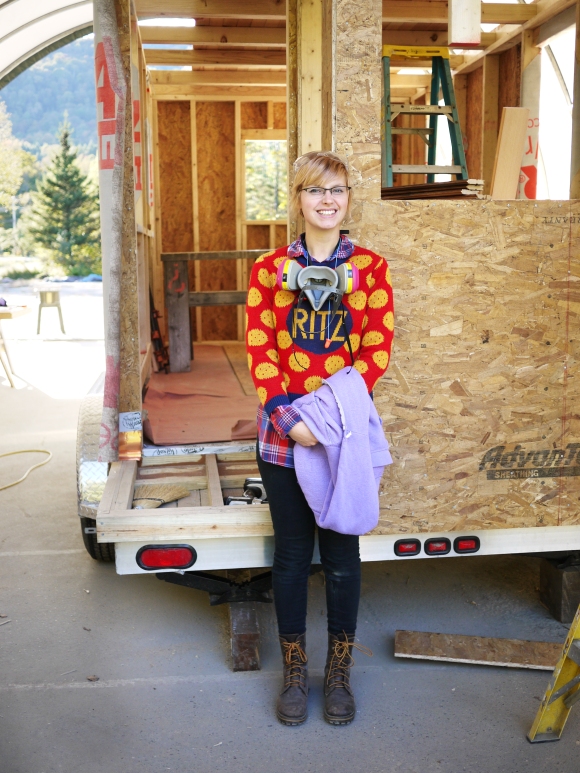
Me with the tiny house, in my famous Ritz crackers sweater. Everyone called me “Ritz” for two weeks. Photo courtesy of Swan Moon.


And there you have it! 10 people built a tiny house in 10 days. After the class, the instructors finished up the siding and now the house is set to go back to Detroit to it’s new owner.


I’m doing a segment for spaces.tv this weekend, which I am super excited about and SUPER busy getting ready for. The COMET will look pretty rad by then, and then I think I’ll do some sort of unveiling (it’s not done, and won’t be till November 2 – Tiny House Workshop with Deek in Boston – but it’s looking pretty good!).

Thanks to everyone to continued support and thank you for reading along!


Tagged , , , ,

Tiny House Summer Camp on the Radio right now!

Tiny House Summer Camp is going to be mentioned/talked about on “Here and Now” and will be heard nationally! This is happening right NOW! Good thing I checked my email!

go here to listen live:

http://www.wbur.org/listen
awesome!


Demolition: Tearing out the Trash in The COMET

Two days ago I began pulling out the rotted wood and un-salvageable parts of The COMET. This post will be most useful to those of you who are thinking about (or in the process of) restoring/re-doing a vintage camper. Here are some of the “fun” things you might find when working on a camper that is over 50 years old!

WALL PANEL

Here’s the rear wall panel. As you can see, there is visible dry rot and water damage under the window. I took off the window frame and decided I need to replace the wood from half way down the window and below (imagine a straight horizontal line continuing off of both sides of the window where the gap in the panes are – everything below that). I began going at it with a chisel before deciding that the job needs a more precise hand held multitool, something like the Rockwell SonicCrafter, which can cut flush up again the walls. I peaked behind the wall panel, and all of the wood back there looks great, no damage. I’m still going to super reinforce the framing of this wall with more beams though, because I’ll want the extra supports when I go to mount the bumper greenhouse later.


WATER TANK

This is a photo of underneath  one of the front dinette benches, where the original water tank was. The water tank was a big hunk of rusty metal, so I used a sawzall to cut it out of the wall and then pulled it out. You can see that this area once kept a mouse very warm! I’m going to clean this area up and put down some new wood, maybe paint it all white so that you can see it better, then have the new water tank (which I ordered yesterday from Timbucktu RV in Worcester, MA) installed in here. I don’t know why there’s an outlet in this box, but we’ll find out!


TOILET

Here’s where I tore out the old camper toilet. Kinda gross! I’m going to try to re-use the tiny camper toilet seat from the original toilet, since it’s so small and perfect sized for the tiny closet. You can see that the toilet closet is a step up from the rest of the floor of the camper. I think I’m going to saw through the floor of the toilet closet and replace it with one that is at the same level as the rest of the camper. It’s probably a little higher right now to make room for a black water tank and plumbing, but the composting toilet doesn’t require a tank or any plumbing for water, so it doesn’t have to be a step up like that. Can’t wait to take out the floor and see what’s lurking under there… Can’t wait to show you all the mock-up for the squatting composting toilet.


INLET

Here’s the 30 amp/120V AC inlet that is on the exterior wall of the COMET. The male inlet is missing, so I got a whole new assembly (Thank You TIMBUCKTU RV!!). This is just temporary, so that I can use the lights and outlets in the camper, until the PV system is installed.


It’s been pouring rain the yesterday and today, so I’m hoping it lets up soon so I can get back to work! Someday I’ll have an indoor workshop and won’t have to rely on good weather. I’ve been collecting all of the materials I will need for the first few repairs (hardware, electrical, wood) so I won’t run into any unexpected roadblocks.

Tagged , , , ,

Simple Solar Showers for Summer

Good Morning!

Last night I perused the web for the best, simplest solar shower devices on the market. I was looking for something affordable and convenient. The COMET doesn’t have room for a shower inside, so she will have a solar shower outside, with some sort of portable, collapsible, privacy shower set up that I can pop up behind the camper (I like the idea of a little teak platform with a circular curtain rod made of metal piping that can break down easily when I’m on the move, and some sort of hook to hang the solar shower on once it is heated up).

Here are my favorite finds from the my solar shower research!

Summer Shower 5, $25 on Amazon.com

This 5 gallon solar shower is a new spin on the traditional black bag camp shower that you hang from a tree. It absorbs tons of radiant heat from the sun, and has a nifty little simple thermometer to let you know how hot the water is. This little added technology makes this the best cheap solar shower. It got great reviews, as well.

Pump-Up Solar Shower, $40 + $15 shipping, Duckworks Boat Builders Supply

I love this idea for a solar shower. Because it pumps up, it has more water pressure than the gravity fed bag shower. I saw DIY instructions for a solar shower like this, using a garden sprayer painted black and a shower nozzle of your choice, but when I priced it out, the individual parts to make my own were more expensive than this one! This one is meant to be more like a real shower than the camp bag shower. It’s a nice option for a solar shower, and perhaps the one I’ll end up with!

DIY Gravity-Fed Hose Coil Solar Shower, price varies, DIY

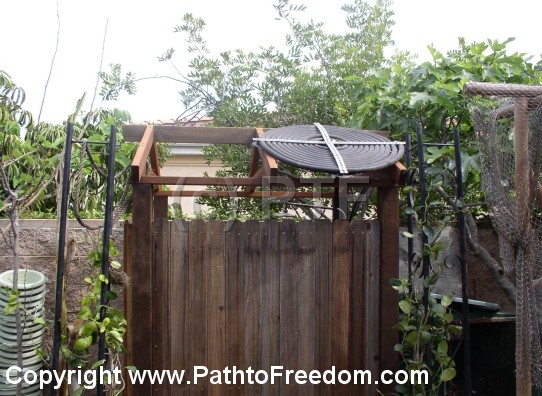
This solar shower is the most permanent and labor intensive on this list. You can use either black garden hose or flexible black piping, coil it into whatever shape fits your space, and voila! The advantage of this coil solar shower is the increased surface area (as compared to the ones above), which means that the water will heat up much faster (20 minutes as opposed to 2-3 hours for the bag/tank systems). I am hoping to eventually build one of these for The COMET, and either have it be able to break down and be portable, or have it attached to a frame on the back side of the camper, which can flip down when I’m mobile, and flip up into a shower stall when I’m parked!

…………………………………………………………………………

Also, I built a vacuum form yesterday! I built the vacuum form so that I can vacuum mold my own custom urine diverter for my small-space composting toilet (which is also turning into a squatting toilet!). The vacuum form is totally portable, so that I can bring it to workshops, do demos, and show people how easy it is to make your own urine diverter for cheap! I’ll post pictures and a full DIY step by step guide later, but for now it’s out to the driveway to work on The COMET. I have lots to do in the next few weeks!

Tagged , , , , , , , , ,

…And we’re back!

Hey everyone!

I was away from the blog this past week traveling with no internet access (turns out it is very hard to find free wifi in Europe!) but I am glad to be back in action today. I really missed The COMET while I was gone and can’t wait to get back into the swing of things this week. I took some really neat pictures of the tiny appliances in the apartment we were staying in, perfect ideas for a tiny house on wheels. I’ll post those pictures soon as I get ’em off the camera 🙂 I saw a couple of cool European campers, but as unable to get photos of them.

I also read more about vermiculture (worm farming and composting) and thought that in a mobile setting it probably makes the most sense to just have a worm farm and no traditional compost pile, since you’d only be making food scraps and no lawn waste or other debris. Anyway, more on that later!

I’ll also post some neat little pictures of the British wartime era posters that I saw at the Imperial War Museum about how important it is to grow your own food, and about how bunnies can be fed on grass, vegetables, etc. The illustrations are incredible!

All right, we’ll be back later with more posts and pictures. Until then!

XOX

Mariah

Compost!

I don’t know much about composting (I’ve always composted – having lived in collectives/communes most of my life so far – but don’t know the science behind it per-se), but I’m about to learn. Because I know I will have a composting toilet in The COMET, I have been looking into more information about composting food waste and humanure.

I’ve been reading The Humanure Handbook (third edition) which you can find here for free download: http://humanurehandbook.com/

Now that I’ve decided to build my own composting toilet for The Comet camper and opted not to purchase a very expensive one, I really look forward to reading this book. I’m hoping to make the most out of a composting toilet/other compost situation on the road by having a “bumper” garden…I’m working on a design for a little greenhouse that mounts onto the back of The COMET.

I’ve also been reading about worm farms and worm bin composting…there are some great DIY guides out there for making your own cheap worm bin. This may not be ideal for the mobile lifestyle, but I plan on living in The COMET in some places for extended amounts of time at some point, and it’s pretty interesting anyway. Maybe I can get my parents to get a worm bin!

Another composting situation that REALLY appeals to me (and is not perfect for mobile living either, but hey!) is a bunny rabbit compost set-up. Apparently rabbit poop is really good for compost, and can even be used raw (without going through a composting process at all!). I was reading about a set-up where there is a compost bin directly underneath the rabbit’s coop/dwelling, and the poop just goes right into the compost! I’m not exactly sure how well this works in practice, but it seems like a great idea. I’d be really excited about a bunny or two…of course they are adorable and I love little animals!

Coming up later today: PART 2 of “Advice for Buying Your First Vintage Camper”, where I go into detail about what to look for and what to avoid when looking at a potential camper project. Lots of pictures! Stay tuned!

Tagged , , , , ,