Category Archives: Vintage Campers

COMETCAMPER.com is Getting a Makeover

Hello readers!!

I’m very excited to announce that this little blog is getting a big makeover!

I’m writing to tell you all a few things about the new website I’ve been working on.

For the past few weeks I have been working very hard on designing and building a new website for COMETCAMPER.com. This new website has many more features, easier navigation, more fun stuff, and is looking pretty darn nice (it’s not done yet, but so far so cute!).

I would be very grateful if you guys, my awesome readers, would join me in the new and improved COMET CAMPER universe once it is all set up. First off, thank you to everyone who subscribes to this blog. You are my motivation and inspiration! For my readers that are subscribed via email, I should be able to just bring you over to the new site no problem (you’ll still get updates about blog posts / etc).

For those of you that are following via WordPress blogs, I would be SO HAPPY if you guys came over to the new site and re-subcribed with an email address, if you still enjoy this blog 🙂 Thank you for helping me with this transition! I’m doing everything I can to make it as smooth as possible. I will update again soon and let you know what is up!

Also, is there anything in particular you guys want to see in the new website? What’s your favorite part of this site, or your least favorite part? I’m going to be posting more regularly (2+ times per week) and will be expanding what the site covers to include more of my interests such as entrepreneurship, travel, camping, and gardening (in addition to the vintage campers, tiny houses, and sustainable design stuff!). Basically, I’m doing a complete overhaul, and getting really excited about being in touch with you all more often than right now. It’ll be the same COMETCAMPER you know and love, but with more posts, more cool stuff to look at, and more awesome. I’ll also be adding more social media as well. I don’t currently do social media (besides this blog), but it’s high time I hang out with you guys in more ways. I’ll let you know how you can find me across the Internet what that’s all set up.

Hopefully there will be very little downtime (if any at all) during this transition.

On a separate note, someone mentioned me on their facebook and brought a lot of new views to my site, if that was you, I want to thank you tons!! WordPress doesn’t show me where the views came from, so I can’t thank that nice person. But if you’re out there I really appreciate it!

Again, thank you all so much for continued interest and support. I’m telling you, this camper renovation is really testing me right now (the GRINDING is NEVER ENDING!) but you make it all worth it. ❤

-Mariah

Tagged , , , , , , , , , , ,

Where have I been? What’s going on?

Where have I been?
It’s a good question! I’ve been really busy the past two months, but haven’t made a ton of progress on the COMET. Other vintage camper people out there, have you ever tried polishing the pitted, foggy aluminum back up to a mirror finish? It takes forever! It also requires a large angle grinder, which I’m embarrassed to say I can’t really lift up in the first place (so it becomes Matt’s job). We’ve been working on it little by little, but it takes many hours and is a crappy job. It’s the one thing standing in between me and a beautiful exterior paint job (also Matt’s forte because he used to do fancy pin striping and decals on cars).

SHAMELESS SELF PROMOTION ALERT:
www.planetqueenvintage.etsy.com
The reason I have been so busy is because I really need money to complete the COMET and I had to put a lot of time and energy into my Etsy shop, where I sell awesome vintage clothing. My shop is called Planet Queen Vintage (based on the T Rex song but also referencing awesome ladies that do cool stuff to positively impact the planet) and I would be so grateful if you guys took a minute to check out all the new stuff and hard work I’ve been putting into the shop the past few months. I added 100+ new items, took better photographs, and increased the overall awesomeness content. Bet you guys didn’t know I run a business on the side in addition to the COMET?! Vintage fashion is my secret weakness ( and vintage furniture, and sunglasses, and campers). All of the profits from the shop right now go DIRECTLY (like, every penny) into finishing the COMET. If you see something you like and decide to buy it, you will be helping me buy some non-toxic exterior paint, some photovoltaic components, and some other little things needed to complete this project. Take a look even if it’s just to give me a critique on the shop, I’d appreciate that too! If you see stuff you like, you can check back often because I add multiple new items every morning. Thank you nice readers!
www.planetqueenvintage.etsy.com

Over the summer, after the Tiny House Fair, I found myself really struggling to figure out where I fit in (me and the COMET both). What am I doing with this? Am I making a difference? I wasn’t really sure if I fit in with tiny house movement, after getting those discouraging comments (yes, I know the COMET isn’t a cedar sided 6-12 pitch roof home on wheels – who said it had to be? and yes, I know there are not yet solar panels on the top, its’ not finished!). I started getting frustrated and questioning my work and my whole life really (uh oh). Am I just another over privileged college kid doling out sermons about things I can’t possibly be know all the answers to (life lessons, how to be greener, how to be happy)? Do my blog posts and carefully curated photographs add to the fetishization of simple lifestyles that I’m finding make me more and more uncomfortable? Are tiny houses just becoming another commodity for consumers to purchase and own in addition to their “big” homes? It sounds kind of negative, but I just had to reflect on what I was doing and why, and how to be more honest with you guys and myself, and accept the limits to what myself and the COMET can accomplish. We’re not perfect, and that’s a hard thing to admit. I have to tow the camper with a gas guzzling truck, so is that trade off worth it? I want to educate people about sustainability in a fun, hands-on way with the COMET, but at the same time in order to spread the word and talk to all of these wonderful people I have to use a fossil fuel burning machine. There are lots of contradictions, I just have to be able to articulate them and then wait to see if a reconciliation can ever be reached.
On another note, I have been receiving lots of nice notes / messages from all of you, and I want to say that if I haven’t responded yet it is truthfully only because I want to give each and every response the time and energy it deserves. Sometimes that means it takes me a while to get back to your messages and emails, but I honestly appreciate and love each and every time someone takes a moment to email me. Let me know what you’re up to, ask a question, give me some feedback. I will respond, I just want to be able to give my full attention to all of your awesome inquiries. Keep ’em coming! Thank you everyone for reading along with this journey that is WAY longer and WAY more complex than I thought it would be!! You all keep me going with every comment and email message I receive. You remind me why I have to stick out the difficult parts (angle grinding / polishing) so that I can do the awesome parts (meeting you all on the road, talking to you, and sharing camper stories!).

I also watched “Chasing Ice” the other day, and it filled me with urgency and purpose. It’s a very good documentary.

The past few months Matt’s been getting excited about survival techniques and survivalist skills – which is really awesome because we’ve been making lots of fires from scratch and improving our fire cooking cast-iron skillet skills. We’ve been talking a bit about the similarities and differences between “Survivalist” an “Sustainability” movements. I think after living out of the Honda Element car for two months in the spring we both just got into “survivalist” mode, and even though we’re back in the city currently we still like to do all the stuff we do when we’re camping for a long period of time.

I want to share some cool links with you all that I’ve been collecting the last few weeks, check them out if you have a moment:

This first one is a really awesome interview from the Etsy blog from a while ago. The interviewee is Frankie Moore Lappe, author of “Diet for a Small Planet”. She hits the nail on the head in talking about the problem with how we currently frame sustainability with language and diction like “reduce”, “avoid”, “limits”, “minimalize”. I’ll let you guys read the article then maybe I’ll post the essay I wrote two years ago about the problematic language of the sustainability movement so you can see the similarities + differences.

https://www.etsy.com/blog/en/2013/an-interview-with-frances-moore-lappe/#comment-880359

The next link is to a video of a guy’s conversion van (Sprinter) that I think is pretty neat. The one thing I don’t understand is having a toilet. I lived out of a car for months and I never once missed a toilet (THANK YOU P-STYLE FEMININE DIVERTER!) and I think it would make your living space more unpleasant than pleasant. Other than that, it has some neat ideas. Theoretically, I am sort of getting over the “squeeze as much into the tiny mobile thing as you possibly can” idea, but it’s cool nonetheless. I’m really into the mint green paint job.

http://www.youtube.com/watch?v=bR0-Y5nHvQ8

Also, the amazing Robin Hayes from Build Tiny (http://build-tiny.com/) is hosting a workshop soon (October 10-13) in VA and you all should check it out. Robin is a really inspiring lady who I have met at multiple workshops all over the place. She is a carpenter, plumber, doer, maker, and all around amazing person to learn from. Everyone loves her and her skill and energy are sure to give you the start you need to get your tiny house or other building project on track. Also, dear friends Dee Williams and Lee Pera (Boneyard Studios) will be there helping out, and you need to meet these incredible, smart, (dare I day gorgeous?!) ladies. You won’t regret it!

http://build-tiny.com/ for more details.

Last thing:
I’m writing a book.
There. I said it out loud. Now I really have to do it.

I seriously wanted to steal this sign from Steve Harrell's house (tiny house listings, tiny house vacations). I'll have to paint one myself!

I seriously wanted to steal this sign from Steve Harrell’s house (tiny house listings, tiny house vacations). I’ll have to paint one myself!

love you all, keep me updated with your cool projects and thank you for reading as always

❤ Mariah

Tagged , , , , , , , , , , , , , , , , ,

Project Ventura: a huge success!

I just wanted to give you all an update on the fabulous young ladies of the Ann Richards School and their Project Ventura eco-trailer. They have finished their presentations (you can read about their experiences here: http://projectventura.wordpress.com/) AND they have met their funding goal on Kickstarter!! YAY! So thank you to anyone and everyone that donated – I can’t wait to see how the renovation turns out. You really made this project real for the girls by funding it into existence! (See, high school projects don’t have to be pointless and boring – they can be awesome and life-changing like this!).  Congratulations, ARS DAP girls, you are all amazing 🙂

In other news, I got back from my residency at Goddard and was exhausted and then got sick and so have been MIA for a few days. My time at Goddard was really wonderful and empowering. There is a genuine autonomy and agency given to students there. It felt unreal for the first few days, to be asked what I wanted to learn, instead of having things shoved down my throat or having to fight and fight to convince people that Tiny Houses are a legitimate area of study. Everyone there just gets it. And I’m excited about my first “packet” and the coming semester. I did have to postpone my road trip until April, which was very frustrating at first but turned out to be a good thing.

Tagged , , , , , ,

I love my tiny house.

Okay, okay, so I know I’m still trying to catch up the blog with the progress in a chronological and step-by-step fashion – but I can’t help it. I love my little house (even though it’s unfinished) and I want to share what it looks like with you all at this point! So let’s look into the future-present at the most recent photos of the COMET. Give me your feedback in the comments! We’ll get back to the progress updates later – unfortunately this did not all happen overnight 🙂

DSC_7250

DSC_7252

DSC_7256

DSC_7257

DSC_7261

DSC_7265

I'm in love with this little custom hand-made soap holder that Matt made for my kitchen. It keeps the soap off of the valuable counter space and also covers up some irreparable damage on the original back splash so that I could re-use it!

I’m in love with this little custom hand-made soap holder that Matt made for my kitchen. It keeps the soap off of the valuable counter space and also covers up some irreparable damage on the original back splash so that I could re-use it!

DSC_7266

Step into my office...

Step into my office…

Humanure Deposit Receptacle - With Urine Diverting Action

Humanure Deposit Receptacle – With Urine Diverting Action

My new, very modest, closet.

My new, very modest, closet.

DSC_7283

If my cat were in the camper that's the sunny spot she would be sleeping on!

If my cat were in the camper that’s the sunny spot she would be sleeping on!

The couch in the back is also my bed – it folds down/pulls out to be quite comfortable (awesome fabric from Sew Fine Fabrics on Etsy). You can see the Marmoleum click flooring that I used (courtesy of GreenBuildingSupply.com) and the turquoise Marmoleum sheet good countertops (which everyone mistakes for being original – which means I picked the right color!). At first I thought all the colors were a little much, but I like them now. It fits my style. I’m happy with my little fold-down desk area in the back, made out of salvaged 1950’s cracked ice Formica. We used scrap Marmoleum from the countertops to make the bathroom floor, and some panels of cork flooring from the ReStore for the kick-plates in there. The rounded piece of the counter folds up and down too, which has come in handy!

Oh, and I just updated the PHOTOS page too, with these pictures. I updated a few other pages too – check out the new “SUSTAINABILITY” page under the “ABOUT THE PROJECT” header.

Well, it’s not finished, but it’s quite homey, and I love it. I had to share. Thanks for reading!!

Tagged , , , , , , , , , ,

Installing the Fresh Water Tank Fill Spout

The fresh water tank (the only tank in the COMET – no grey or black water tanks) lives underneath the rear couch/bed. Originally it was under the dinette bench on the port side, but that meant that there was about 15 feet of tubing wrapping around the entire trailer to get from the tank to the faucet on the other side. We moved it to underneath the rear bench to be closer to the faucet. The fresh water tank is 15 gallons and I refill it about every 3-4 days. You don’t really use a lot of water when you have to pump it by hand. And the hot water is just one of those black bag camp showers that I hang up outside.

Here’s how we installed the new fresh water tank.

Here's where the new fresh water fill spout goes. Thanks Timbucktu RV Supply in Worcester for all the parts needed for the water tank installation!

Here’s where the new fresh water fill spout goes. Nothing is pressurized, so it’s just an angled spout where you put water form the hose. Thanks Timbucktu RV Supply in Worcester for all the parts needed for the water tank installation!

Close up of the fill. We caulked around the edges, and screwed it into the wall. The small spot to the left of the spout is the vent, which allows the tank to empty correctly.

Close up of the fill. We caulked around the edges, and screwed it into the wall. The small spot to the left of the spout is the vent, which allows the tank to empty correctly.

Here's what it looks like from the inside. We toe-nailed in a piece of plywood so that we would have something more than just aluminum to screw it into from the outside.

Here’s what it looks like from the inside. We toe-nailed in a piece of plywood so that we would have something more than just aluminum to screw it into from the outside.

Here are the lines attached, using hose clamps. The blue and white striped line (the larger one) is the water fill line, it goes from the fill spout to the tank. The clear, smaller line is the vent line for air to escape as the water drains. It goes from the tank to the spout, then outside via that vent.

Here are the lines attached, using hose clamps. The blue and white striped line (the larger one) is the water fill line, it goes from the fill spout to the tank. The clear, smaller line is the vent line for air to escape as the water drains. It goes from the tank to the spout, then outside via that vent. Don’t skimp on the caulking when you’re dealing with the water situation. Better safe than sorry!

Some context.

Some context.

The tank! It came with no pre-drilled holes, so we could decide where to put them ourselves. Using a hole saw bit on the drill, we cut out the correct holes for the hose attachments. There were 3 holes in the tank total: one for water to come in from the spout, one for air to escape when it's draining, and one for water to travel from the tank to the faucet via another line, which is down at the bottom.

The tank! It came with no pre-drilled holes, so we could decide where to put them ourselves. Using a hole saw bit on the drill, we cut out the correct holes for the hose attachments. There were 3 holes in the tank total: one for water to come in from the spout, one for air to escape when it’s draining, and one for water to travel from the tank to the faucet via another line, which is down at the bottom.

Then we cut the new panel for that wall (the old panel was all water damaged under the window and at the floor) and tacked it in.

Then we cut the new panel for that wall (the old panel was all water damaged under the window and at the floor) and tacked it in.

We then put in the framing and front of the rear bench (not tank yet) because we needed to see how we would run the line from the tank to the faucet and make sure everything would fit.

We then put in the framing and front of the rear bench (not tank yet) because we needed to see how we would run the line from the tank to the faucet and make sure everything would fit.

Now, we actually installed the kitchen before attaching the water tank and hooking everything up, so that’s where I’ll stop for now. Basically, the tank got put into it’s spot under the bench, it fit very snugly. We hooked up the fill line to the appropriate fitting that we had installed in the side of the tank, and the air vent line to the appropriate fitting. We put the fitting (barbed) into the bottom for the faucet line as well, but didn’t hook it up until the kitchen was finished. So we’ll look at the kitchen then get back to finishing up the water tank. Photos to come!

Tagged , , , , ,

My Life is Validated by Tenth-Grade Girls


This is probably the coolest thing that has ever happened to me, so bear with me while I explode with excitement and awe.

ventura1
All I ever wanted with this blog and this project was to inspire other people to take their life into their own hands and do something creative with DIY attitude. Well, I never imagined that I would inspire a group of high school girls to undertake such a project, but it’s happening right now!
The girls at the Ann Richards School For Young Women Leaders in Austin TX are not your average tenth-graders. These engineering students focus on project-based learning at their high school. The class’s assignment this year is directly inspired by the COMET, as they turn a 1970’s travel trailer into a solar-powered learning tool. They are incorporating the eco-friendly aspects of the COMET and the small space design techniques of tiny houses into their project. The girls are learning 3D digital modeling, design, green building methods, construction, and more through the hands-on project. Right now, the design groups in the class are coming up with designs, budgets, and plans. The client will choose the winning design, which will be implemented in the trailer this spring.
Needless to say, I was flattered and amazed when their teacher (who is so amazing – I wish I had teachers like this in high school!) emailed me saying that they were undertaking Project Ventura, based on the COMET and my own methods. Now I’m going down to TX this week to teach the class for a week and learn what I can from this group of incredible young women. I can’t wait to see how they’ve improved on my ideas and what they’ve come up with for designs. Matt’s coming as the SketchUp expert, and will be teaching them 3D design using this free program.
I strongly encourage you to check out their blog! It is very detailed and extremely well-written. It will keep you up to date on all of their discoveries and victories. And if you have some money to spare, or think it’s a good cause, consider donating to Project Ventura so that they can begin the building process!
I can’t really describe how happy this class of inspiring young women makes me. I feel like I’ve accomplished a part of what I set out to do with the COMET, and it’s very fulfilling. Of course, I’ll let you all know how the trip goes and I’ll have lots of photos to share. Now go over to http://projectventura.wordpress.com/ and check out these kick-ass ladies!

Tagged , , , , , , ,

Sheet Metal Patches & Bodywork

It’s about 10 degrees here in MA today, and while I look back at these pictures from the summer I am wistful to say the least. So here’s some pictures of some sheet metal work we did on the trailer to patch some gaping holes and button the skins back up after replacing some of the wood inside the walls. Sometimes, when you replace the old rotten wood under the skins, they don’t fit back on just perfectly (they would if I wasn’t going to repaint the thing, but I am so I wasn’t too vigilant about it this time around). There was a gap on the corners of the trailer where the aluminum met and started to separate from the weight of the rear. These gaps had been there since I got the trailer, so I knew I’d have to patch it anyway.

First, we put a strip of sheet metal (aluminum flashing for this application – because it’s flexible/malleable) around the corner and underneath the member for extra protection. We just nailed it in to the new wood. This would be the flashing that would keep any water out. When you put the skins back down, caulk around the edges and screw it in with sheet metal screws (the ones with the little rubber gaskets work well for this, but we just caulked each spot where the screw would go before screwing it in).

This will fill the gap between the original aluminum siding that had separated at the corner. This is common to find in vintage trailers.

This will fill the gap between the original aluminum siding that had separated at the corner. This is common to find in vintage trailers. Matt’s hairy arm, not mine :).

Caulked and screwed back down.

Caulked and screwed back down.

We did the same thing to the spot under the old heater vent, which was a big gaping hole. We flashed with the aluminum strip wherever the skins didn’t meet up just right. This will keep the water out.

Under the old heater vent next to the front door (heater was removed). This step can be a pain in the butt, but is worth it to keep the new framing dry.

Under the old heater vent next to the front door (heater was removed). This step can be a pain in the butt, but is worth it to keep the new framing dry.

Once the flashing was in, we needed to patch that huge hole. We used a different type of sheet metal, stainless steel, for the flat panel that will cover this whole mess. See below.

The process is: caulk around the edges where you're going to place the panel, then lay it on and hold it in place. The caulk should squish out a little, and create a full seal. Put caulk dots all around and sheet metal screw into these spots so that it seals around the entry point of each screw.

The process is: caulk around the edges where you’re going to place the panel, then lay it on and hold it in place. The caulk should squish out a little, and create a full seal. Put caulk dots all around and sheet metal screw into these spots so that it seals around the entry point of each screw.

Close up detail.

Close up detail.

There you have it! We did this on the other side of the trailer where the original water fill was. We didn’t match the corrugation of the original aluminum siding because we figured it was all getting painted turquoise and won’t be a big deal, but if I was doing a period-specific restoration I would match the corrugation pattern of the aluminum.

Thanks for reading and there’s more to come!


Tagged , , , , ,

Adding Structural Strength for a Bumper Garden

When Matt and I went to re-frame the rear wall of the COMET, we knew we had to do some re-design as well. First of all, at some point there is going to be a “bumper garden” (hehe, get it? on top of the bumper…) mounted onto the back of the trailer under the window. Ok, so it’s like a way-glorified window box, but on a moving trailer, and made with polycarbonate so it’s also like a tiny greenhouse too. Since there will at some point soon be soil and metal and plants hanging off of the back wall, we knew we had to beef up the framing. I wanted enough studs that we could lag into to support the bumper garden. The second part of the design had to address the really weird original framing, which had the rear bench (couch and also my bed) come down halfway in front of the rear hatch, which is the only place to really store anything large. Basically, the rear bench bisected the hatch, and I thought that was dumb, because I want full hatch access! So we raised the bench up 6 inches, so it now clears the rear hatch door and give us a little more storage. Here’s how we did it!

A little reference, so you can see how the original framing interfered with the rear access door.

That beam spans right across the access opening, so we did a little re-designing.

That beam spans right across the access opening, so we did a little re-designing.

Those new studs are 2x6's, so very strong. We cut them to match the profile of the curvy back of the trailer. It had to match the existing aluminum shape. Notice that the problematic beam is gone.

Those new studs are 2×6’s, so very strong. We cut them to match the profile of the curvy back of the trailer. It had to match the existing aluminum shape. Notice that the problematic beam is gone.

Here's another view. The 2x4 spanning the two studs ties them together and gives me another place to lag into when I go to attach the bumper garden.

Here’s another view. The 2×4 spanning the two studs ties them together and gives me another place to lag into when I go to attach the bumper garden.

More framing! We added a 2x4 across the top of the access opening. That member will support the bench framing. We re-used most of the wood from the original bench, just re-arranged it. We tried to make the back as strong as possible. We'll see how it holds up when the bumper garden goes on.

More framing! We added a 2×6 across the top of the access opening. That member will support the bench framing. We re-used most of the wood from the original bench, just re-arranged it. The studs (2×2’s) on either side are for nailing  the new wood panel up, you need something to tack into. We tried to make the back as strong as possible. We’ll see how it holds up when the bumper garden goes on.

Just another close-up.

Just another close-up.

Now you can see that the rear hatch is entirely accessible. Much better! And we made room for a slightly larger fresh water tank too.

Now you can see that the rear hatch is entirely accessible. Much better! And we made room for a slightly larger fresh water tank too.

Just a little tip/reminder for those of you that are doing this yourself: NOW IS THE TIME TO MAKE SURE THE TOW WIRING WORKS! While you have access to the wiring for the rear brake/turn lights, make sure everything works. Luckily, the Avalon was working when we got her. But my other camper, the Beemer, needed to be completely re-wired, and it’s better to know before you go closing up the walls.

Insulate with UltraTouch Denim Insulation. See previous post for more about this cool stuff!

Insulate with UltraTouch Denim Insulation. See previous post for more about this cool stuff!

Here's the plywood I cut to be the rear panel. See that little window cut out at the top (the right side?), that's going to be a picture frame that let's you see and feel the UltraTouch from inside the camper. I thought this would be cool for people to see and feel at workshops and such.

Here’s the plywood I cut to be the rear panel. See that little window cut out at the top (the right side?), that’s going to be a picture frame that let’s you see and feel the UltraTouch from inside the camper. I thought this would be cool for people to see and feel at workshops and such.

Well this photo skips a few steps ahead, but you can see the 1/4 inch plywood panel installed (use shanked finish nails). You can also see the new (though made from the original old wood pieces) bench framing. See how the front of the bench, with the access door which is removed in this photo, has a 2x6 (which is 5.5 inches wide) attched to the bottom. This gave us the height we needed to clear the rear hatch! It all worked out as planned.

Well this photo skips a few steps ahead, but you can see the 1/4 inch plywood panel installed (use ring-shanked finish nails). You can also see the new (though made from the original old wood pieces) bench framing. See how the front of the bench, with the access door which is removed in this photo, has a 2×6 (which is 5.5 inches wide) attached to the bottom. This gave us the height we needed to clear the rear hatch! It all worked out as planned.

Here's a close-up of the little insulation view-hole. I have a picture frame that will go around that square when everything's finished.

Here’s a close-up of the little insulation view-hole. I have a picture frame that will go around that square when everything’s finished.


And that’s how to frame for a bumper garden (or any other weight bearing rear storage container)! I really hope this works. I think it’s probably a little overkill, considering the bumper garden will also be supported by the bumper, but I’d rather be safe than sorry!

Next post will cover more insulation and paneling (quickly), and maybe a little more of the bench building. It will definitely cover how to install the fresh water tank.

Thanks to everyone who’s been reading along while I play catch up! I hope all of this is helpful to those of you who are restoring your own vintage trailers. And I hope it doesn’t scare away those who one day hope to!


Tagged , , , , , , ,

Thank You Sew Fine Fabrics!

sewfinefabrics logo


Who said organic fabric had to mean neutral tones of hempy linen? I was bummed out about what I was finding online for organic fabrics options for the COMET upholstery, until I stumbled upon the Etsy shop, Sew Fine Fabrics. I wanted something bright, fun, and retro – not pea-green and scratchy. I was also looking for something affordable (everything else I came across was about $40/yard – yikes!) and Sew Fine Fabrics delivered everything I wanted at an affordable price. Sew Fine Fabrics offers organic lightweight and home decor weight fabrics in bright colors, amazing prints, and retro styling. Jodi Walter Jones, the owner of this lovely shop, says, “I’m seriously obsessed with finding fabrics I love. I spend way too much time tracking them down. I love that organic now means colors and textures and modern designs rather them the plain oatmeal color of the recent past.” I could not agree more.
I used the Pinstripe organic home-decor weight fabric for the rear bench in the COMET (also my bed!). I also used the Starburst Orange fabric for accent pillows. I was so excited to find an organic fabric in a pattern that I loved in the exact color scheme of the COMET – teal and orange! It’s a perfect match. And all the fabrics are SUPER soft and sturdy. Just recently I ordered some more teal + orange fabrics from Sew Fine that I haven’t used yet, but plan on incorporating into the trailer soon.
So if your looking for some eco-friendly fabrics to use in your tiny house, vintage trailer, or other project, please do check out Sew Fine Fabrics on Etsy. Jodi is super sweet, and is happy to make up custom listings. I wholeheartedly recommend Sew Fine Fabrics.

Here are some pictures of the couch and pillows, all done with fabric selected from Sew Fine Fabrics.

starburst

comet couch

DSC_7279

Here’s a taste of some of the other organic fabrics that Jodi has over at Sew Fine Fabrics (I’m in LOVE with the vintage trailer one – check out her website for other vintage trailer themed fabrics):

camper fabric

sew fine 3

sew fine 2

THANKS SEW FINE FABRICS!

Tagged , , , , , , , , ,

Thank You Fletcher’s Trailer Sales!

As the weather get’s colder and fall is in full swing, it is safe to say that work on the construction of COMET is winding down for now. It’s a little too cold to paint the exterior outside, so until I find an indoor workspace I’ll have much more time to post about the progress of the last few months. I’m glad for the change of pace!

Lots of exciting things happened for us in the last few weeks. We brought the COMET to Deek Diedricksen’s tiny house workshop in Stoughton, MA. It was an awesome weekend of talking tiny, building a super teeny house on a trailer, and lots of time around the campfire. We got to hang out in the Whittled Down Caravan with Tristan and Libby, which was great. At the workshop we were interviewed for an NPR show coming up (I’ll definitely let you know when I find out the air date), which was unexpected and totally awesome. We also did a video with Deek for Tiny Yellow House (his youtube video channel), which will be out soon I hope! Even though the COMET remains a work in progress, it is really shaping up into something lovely, and people seemed excited about the future of the project. After the tiny house workshop, we did a video shoot for a Spaces.TV “Offbeat Spaces” webseries episode, which was really neat and a new experience for me. The COMET is such a technical project for me, and talking about the aesthetics and interior design choices for the Offbeat Spaces video was a welcome change!
Anyway, lots of re-capping and catching up to do as always (I think the only solution to this would be a clone…anyone?)…but I promise now that the weather has made working outside less feasible, I will be spending more time with the blog!

…………………………………………………………………………………..


Now, to the rest of this post!

I got a really good question about where to get replacement windows for vintage trailers. I thought I’d share the best answer with everyone in this post!

I want to introduce you to one of my supporters, Fletcher’s Trailer Sales. Some of you fellow trailer nuts probably know about them already, and for those who don’t – they are an amazing one stop shop and resource for all things vintage trailer related.

I always loved the Vintage Kingpins website. Before I had a vintage camper of my own, I would always keep an eye on it for project trailers for sale, and when I bought my first trailer the website was a great resource (and their parts inventory is AMAZING!) I hope to have as many vintage campers (and other neat stuff) as these guys some day.

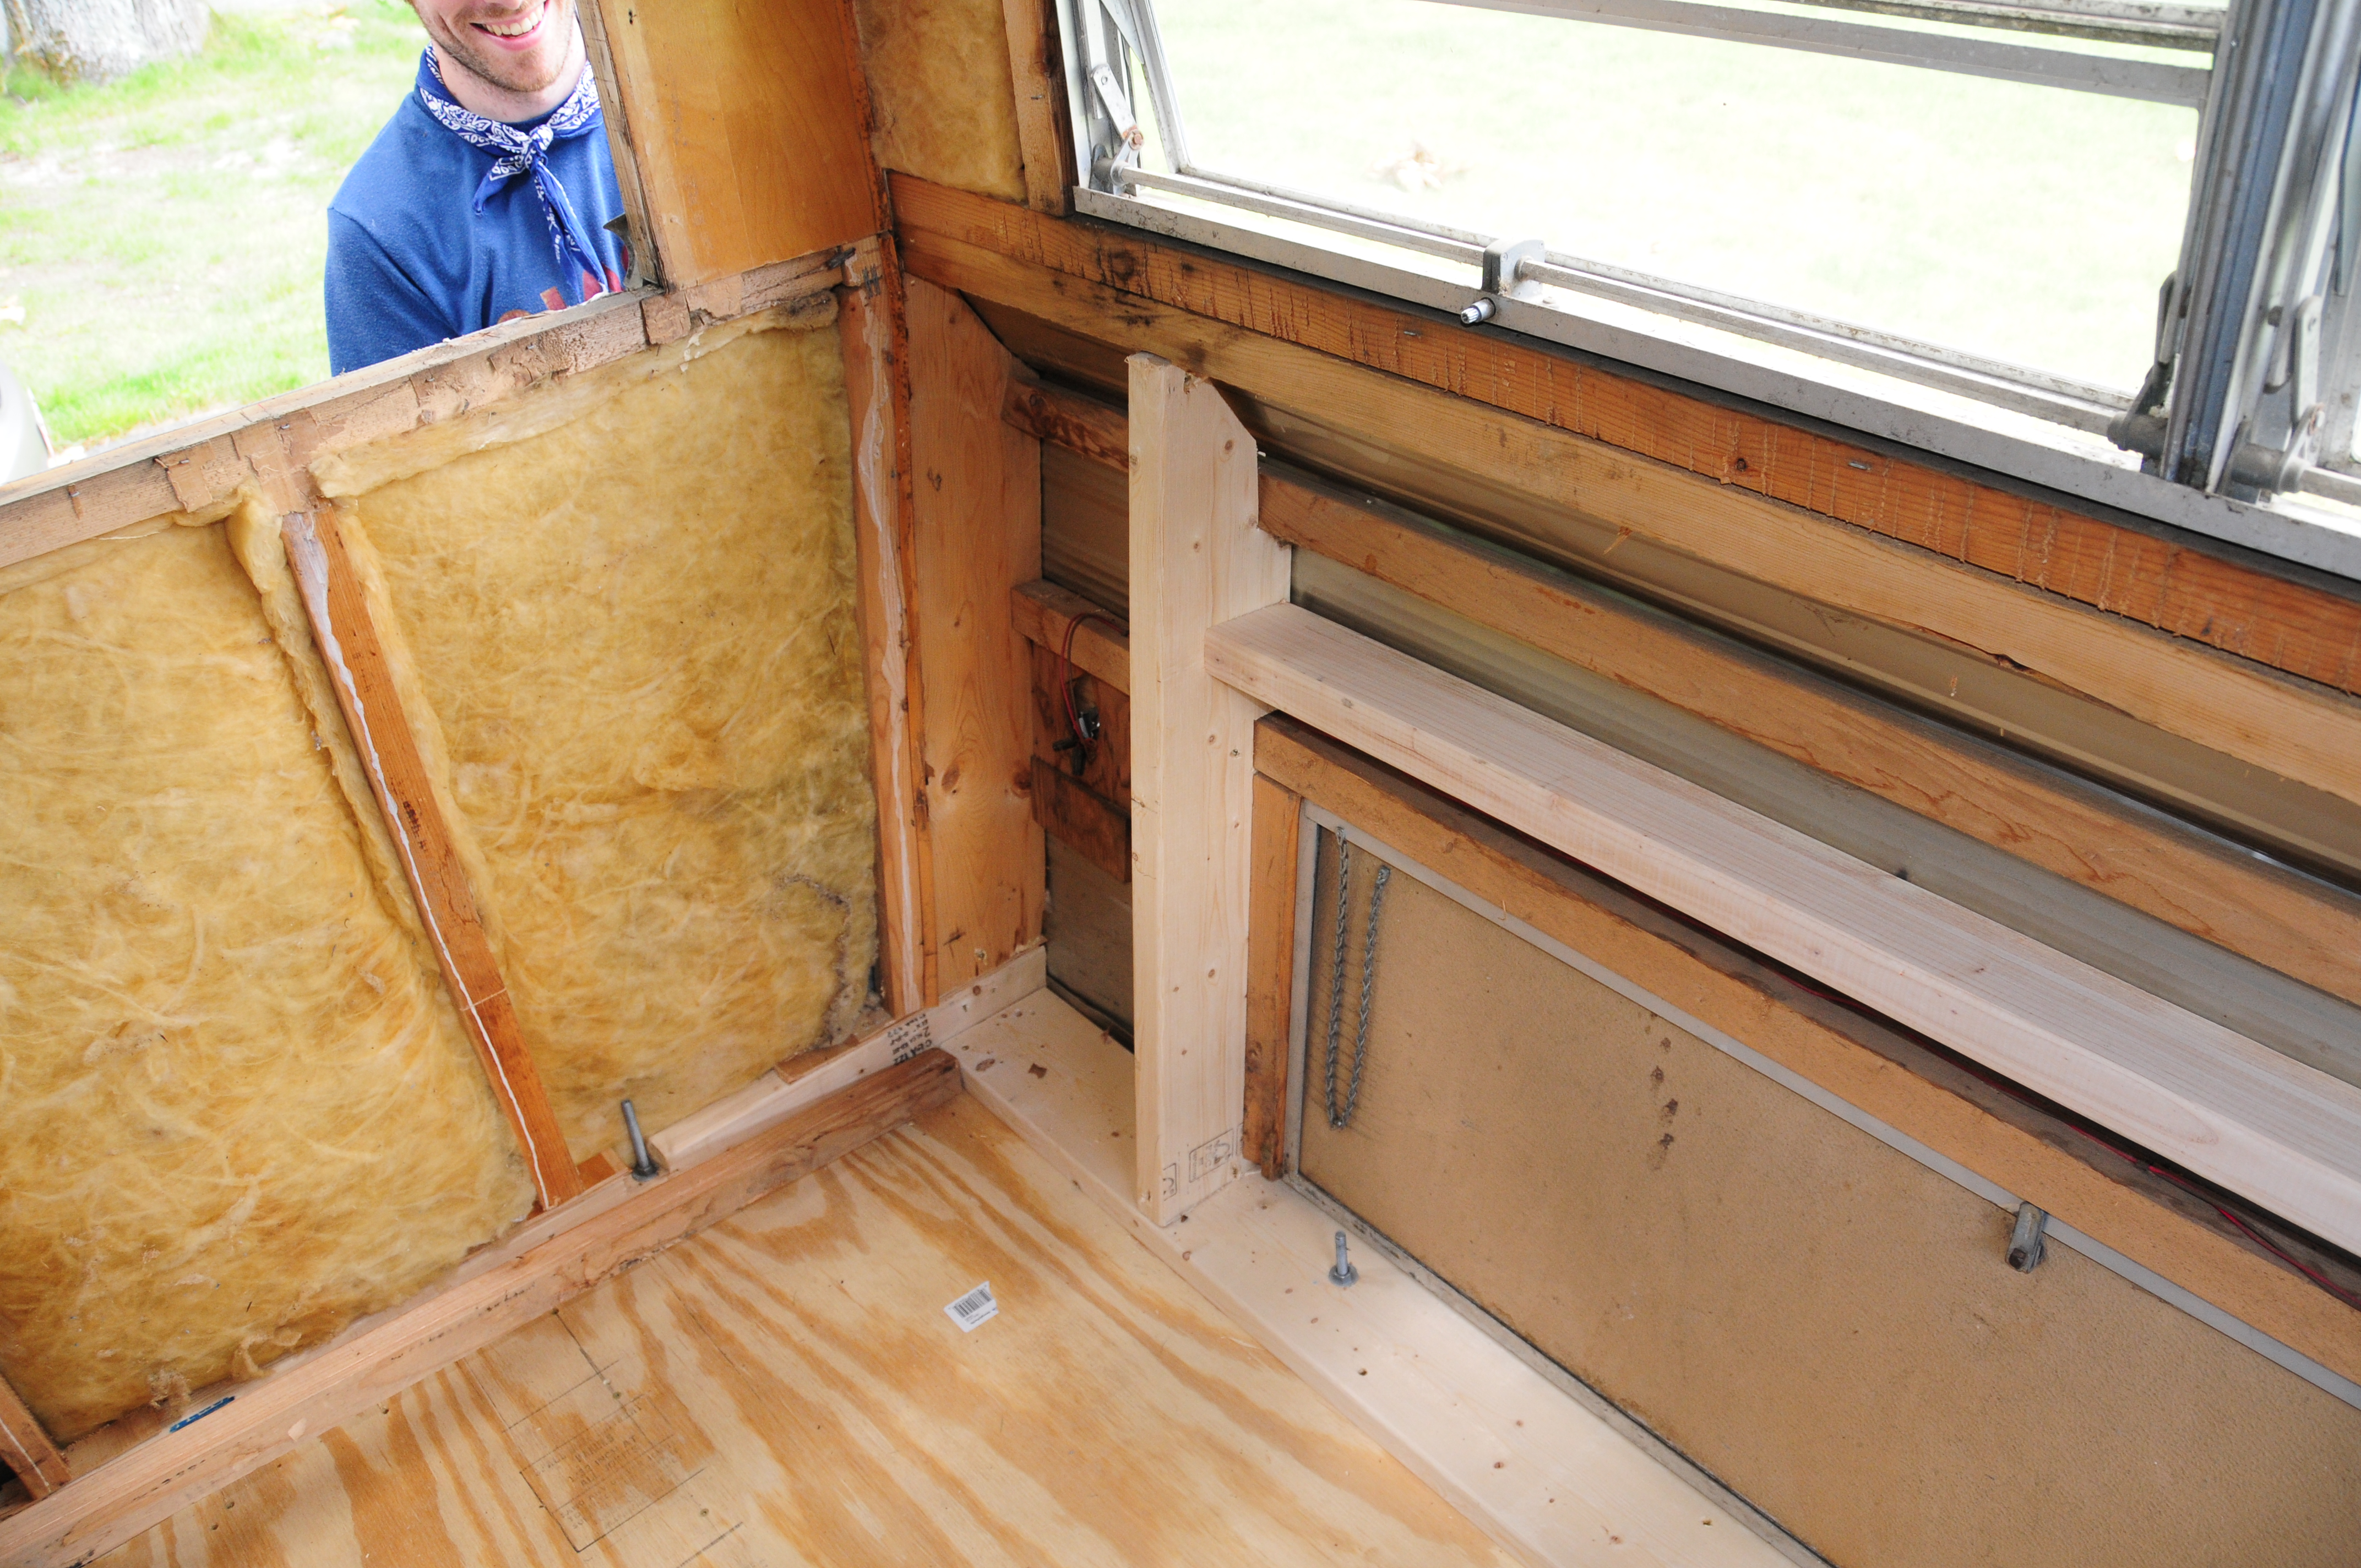
One of the windows in the COMET was broken, not just the glass, but the whole assembly was just trashed. I was nervous that I would have to replace it with just some inoperable system of my own devising – like a stationary piece of glass in a frame. I thought there was no way I would be able to find a matching window.

But I checked on the vintage trailer websites, and saw some campers that looked similar to the Avalon on the “Trailers for Parts” page of the Fletcher’s Trailer Sales website. I called them up, and Fletch  – who is as helpful and friendly as can be – was happy to go out into the lot and look for a double jalousie that was the size of the one that needed replacing in my own camper. Within minutes he had located the exact window that I needed, and promptly pulled it from the parts trailer and shipped it to me. I could not be happier with what I received in the mail. It is amazing to me that from anywhere in the country you can find something so hard to come by – a unique vintage trailer window that perfectly fits my camper. I don’t know of any other business that will pull exact parts for you out of their “harvesting” trailers and send them to you anywhere in the US. It’s amazing! And they have a great selection of campers (for parts and for sale) from all eras and styles. If you don’t see what you need in their trailer parts category on the website, give them a call and tell them what you need. I’ll bet they have what you’re looking for. We all want the most authentic parts for our restorations – and the best (and greenest!) way is to get it vintage.

Here’s a little bit about Fletch and Denise, the Vintage Kingpins themselves, from their website:

“I’m Bill Fletcher and along with my wife Denise we own and operate Fletcher’s Trailer Sales and Service Inc. We are a second generation, full time family run business that has been serving the public since 1963. Since then we have sold many brands of camping trailers, travel trailers, motor homes, truck campers, and utility trailers of all sizes and types, both new and used.
During the past several years we have turned our attention toward vintage and classic travel trailers. We feel that the timeless styling and rugged construction features of these beauties is not only a good investment, but also one that you can enjoy for a lifetime. Why be one of the masses with a cookie cutter box on wheels that will only depreciate in value? Why buy a trailer for $20,000 that is constructed of re-cycled beer cans and chipboard when you can spend far less of  your hard earned dollars on something with soul, that will turn heads and get thumbs up wherever you go.
Our mission is quite simple, treat others like you would like to be treated, honestly, fairly, with courtesy and consideration. We feel that this policy has kept us in business year after year while others have come and gone.
What do we have to offer? A nice selection of un-restored trailers from the smallest Scotty’s and teardrops to 40’ birch paneled mobile homes. We also have a number of ‘parts’ trailers that have unfortunately surpassed their own lives and will contribute their various parts to help other trailers go on and on. Although we do not offer full restoration services we will accept small projects and/or general service work from suspension and running gear up dates, to appliance repair with most everything in between. All work is preformed by myself with 36 years of past experience. Looking for vintage, hard to find parts? Give us a try. Either E-Mail or call (607-387-5838) and we’ll guarantee to do our level best to help you out.”

Oh, and they are also the Northeast Representatives for the Tin Can Tourists group!

I highly recommend Fletcher’s to anyone working on a vintage camper, or anyone looking to purchase a project trailer. And, if you’re on the tiny house wavelength, Fletch said that he has sold a few trailer chassis’ to people planning on building a tiny on a re-used trailer. A great idea! So get in touch with him if you need a trailer to build your tiny house on!

Here’s some pictures of Matt and I replacing the old window with the new one from Fletcher’s. THANK YOU FLETCHER’S TRAILER SALES!

Here’s the replacement window from Fletcher’s, before it was installed. It is an exact match to the one that was originally in the trailer (actually, it is a little nicer than the original!).

We removed the original window, scraped off all of the old caulking, and had a clean slate to work with.

Matt scrapes off some more old caulking before installing the new window.

We ran a bead of new caulk all around the edge of the window before installing it, to seal it (you can sort of see the white caulk around the edges). We used stainless steel sheet metal screws (which match the rest of the screws) and installed the window in a snap. It fit perfectly, and works great!

Again, a big thank you to Fletcher’s Trailer Sales for supporting The COMET and education in sustainable, tiny living!


Tagged , , , , , , , ,