Tag Archives: The Comet

COMETCAMPER.com is Getting a Makeover

Hello readers!!

I’m very excited to announce that this little blog is getting a big makeover!

I’m writing to tell you all a few things about the new website I’ve been working on.

For the past few weeks I have been working very hard on designing and building a new website for COMETCAMPER.com. This new website has many more features, easier navigation, more fun stuff, and is looking pretty darn nice (it’s not done yet, but so far so cute!).

I would be very grateful if you guys, my awesome readers, would join me in the new and improved COMET CAMPER universe once it is all set up. First off, thank you to everyone who subscribes to this blog. You are my motivation and inspiration! For my readers that are subscribed via email, I should be able to just bring you over to the new site no problem (you’ll still get updates about blog posts / etc).

For those of you that are following via WordPress blogs, I would be SO HAPPY if you guys came over to the new site and re-subcribed with an email address, if you still enjoy this blog 🙂 Thank you for helping me with this transition! I’m doing everything I can to make it as smooth as possible. I will update again soon and let you know what is up!

Also, is there anything in particular you guys want to see in the new website? What’s your favorite part of this site, or your least favorite part? I’m going to be posting more regularly (2+ times per week) and will be expanding what the site covers to include more of my interests such as entrepreneurship, travel, camping, and gardening (in addition to the vintage campers, tiny houses, and sustainable design stuff!). Basically, I’m doing a complete overhaul, and getting really excited about being in touch with you all more often than right now. It’ll be the same COMETCAMPER you know and love, but with more posts, more cool stuff to look at, and more awesome. I’ll also be adding more social media as well. I don’t currently do social media (besides this blog), but it’s high time I hang out with you guys in more ways. I’ll let you know how you can find me across the Internet what that’s all set up.

Hopefully there will be very little downtime (if any at all) during this transition.

On a separate note, someone mentioned me on their facebook and brought a lot of new views to my site, if that was you, I want to thank you tons!! WordPress doesn’t show me where the views came from, so I can’t thank that nice person. But if you’re out there I really appreciate it!

Again, thank you all so much for continued interest and support. I’m telling you, this camper renovation is really testing me right now (the GRINDING is NEVER ENDING!) but you make it all worth it. ❤

-Mariah

Tagged , , , , , , , , , , ,

Interior Floor Demolition!

This is what I was doing the last few days. Later on I’ll post pictures of what it looks like now, with the new framing, insulation, and flooring.

Basically the entire rear floor, under the bed/couch under the window, had been destroyed by a combination of water damage and termites or carpenter ants. There was no framing left in the rear 4 feet of flooring, it was just dust at this point. We ended up pulling out an entire wall’s structural members and floor studs: there was a lot of day light coming through. This is the most structurally-intense renovation/repair I have ever had to do in a trailer, but it was similar in nature to the repairs I had done to fix water damage in other trailers, so progress has been going very quickly!

I’ll walk you through peeling back the layers of rot. Don’t let this discourage you  if you’re considering repairing your own vintage trailer. If I can do it, anyone can. Oh, and a big thank you to my friend Matt for helping me out in these hectic weeks before Tiny House Summer Camp, and all the other weeks he’s helped as well.

The thing about repairing the framing in these is that you peel back one wall to fix one problem, which then allows you to see about 8 other problems that you hadn’t noticed before. And everything is built originally from the frame up, so you’re trying to get into places that were put together in an order that makes it challenging to get at things retroactively. We ended up pulling back some of the exterior aluminum to be able to reach certain spots better.

This is the rear of the camper where I pulled back the linoleum sheet floor to find a soft pile of dusty wood. You can see the corner was just rotted through. But I didn’t know how far the rot had gotten until I dug deeper.

I used the SonicCrafter and my hands to pull out all of the rotten wood framing. The wood was so rotten it just came right out for the most part. Some of the stuff I pried out with the Wonderbar. you can see the black wood in the corner, where day light is coming in. That’s not good! Basically water rots where it sits, which is why the wood under the window is fine but the floor is ruined. Even though the water was coming in through the window, it was flowing down into the floor and had no way to escape.

I then tore out the kitchen, realizing that the floor framing on the starboard side was rotted out beneath the kitchenette. I also knew by stepping on it that the floor next to the heater, below that big round hole in the wall where the vent was, was all rotted out. I carefully removed the kitchen so I could get at the floor there.

This is the view from the outside. This entire length of member was rotten with water damage.


Here you can see where I used the SonicCrafter to cut out the rotten wood to where it was solid again. Those straight cuts are where the wood is no longer rotten. It looks like a huge mess, but is surprisingly simple to fix when you have control over how you want to re-build. I knew I wanted to rebuild it ten times stronger than it was originally. Originally, the studs in the wall were stapled (yes, STAPLED) to the floor beams. Not exactly sturdy construction.

I’ll post pictures of what we did to fix this mess later on. I think it turned out pretty good!

Anyway, one of my best friends just bought a vintage trailer to live in (we’re going to have a caravan!) and she’s in the process of repairing the rear rot as well. Today she’s coming over to help me out and see what you can do to fix that sort of damage. If I can convince at least one other person that living in a trailer is an awesome idea, I would say this project has been a success already!

**Another huge thank you to Green Building Supply, who really helped me out yesterday on such short notice. I was having a really hard time figuring out what to do about the countertop in the COMET. I wanted to re-use an old Formica table, and I ended up getting one off of craigslist, but it turns out is isn’t the right size for the counter. I called up Green Building Supply looking for a solution and they recommended Marmoleum, the same stuff that my flooring is made of! You can get Marmoleum in tiles or planks for floors, or you can order it in flexible sheets, which works like a natural laminate countertop. It’s completely non-toxic, natural linoleum and basically indestructible. I picked out a really cool teal color, Azzuro. It is a similar pattern to the flooring, sort of swirly and marble-y.

I also got some of the non-toxic Forbo (who makes Marmoleum) adhesive to put the countertop onto a piece of plywood I have lying around. I’m going to re-use the vintage aluminum retro trim from the original countertop around the edges, so it will still have that vintage look. Can’t wait to get this in the mail!

As always, thanks so much for reading. I’ll update again later on, gosh-willing I can keep my eyes open after I’m done in The COMET.

Tagged , , , , , , ,

Check out this Pinterest page – all about tiny houses and camper restoration

Someone shares my obsessions!

I found this Pinterest page (board?) a while back and have been refreshing the tab regularly ever since. It has all sorts of great links to DIY tutorials, camper eye candy, off-grid trailer ideas, and more. New things are added to the board all the time. Check out this link for camper and tiny house ideas!

Not Quite Vintage Tiny Homes/RVs

This is a great idea for linoleum tiles. You could do this with Marmoleum flooring pretty easily!

**Tiny House Summer Camp is SO SOON! Less than 2 weeks away, and the COMET has no floor and a wall is being replaced and reframed. I need to get the pictures off of my camera and onto the blog so you guys can see what I’m talking about! It’s crazy.

Anyway, I PROMISE pictures and details about all of the repairs later. I think you guys will enjoy the walk through. It isn’t pretty, and it’s more structural repair than I’ve ever had to do in a trailer before, but it’s encouraging because, thanks to my prior experience with last summer’s trailer, Matt’s help, and the Rockwell SonicCrafter (I need to do a tool review – this thing can’t be beat), it’s taken me 4 days to do what it took me 2 months to do last year. Amazing!


Tagged , , , , , , ,

On Design: Goal Articulation (What do you really want?)

Hello!

Core is going GREAT here at Yestermorrow. Vermont is beautiful. The class is AWESOME (and extremely intense). Totally crazy coincidence: my instructor is moving into the Whittled Down Caravan (check out their blog) that I saw at Derek Diedricksen’s workshop last summer. The tiny house scene is a small world (har har – pun intended.)

Anyway, here’s what I’ve been thinking on the last day or two:

I think I’m going to start getting more conceptual on this website sometimes. It’s my platform for expressing everything that goes into The COMET – which is so much more than solar panels and recycled materials and new technologies. My heart goes into it, my dreams (mostly daydreams) go into it, all of my time and energy. A lot of THOUGHT goes into it – more than can be measured. It’s completely consuming – and I love that about it. In a single, life consuming project I get to explore a world of possibilities and techniques and processes. An entire history of changing attitudes about the way we live.
(Being at Yestermorrow gets me really excited about this stuff – maybe that’s why I’m feeling this way at the moment.)

So here I can express some of the THOUGHT and process that goes into the Design of the COMET as an educational tool, a classroom, and a home. More than just design iterations of program and diagramming, there is a mental and emotional process that goes into designing your own home. Here’s what I learned about myself as a designer today:

For the last few years professors have reprimanded me for being obsessed with technique and materials (what can I say, I’m a doer and a maker). They offered no alternative, but I understood that the way I approached design was backwards and too focused on minute details from the start. Today I had a major breakthrough. Woah.

Goal Articulation:

what do you want? Can you accurately express what you REALLY want out of your home (or another design)?
You want a tiny house, a big house, a cute house, an energy efficient house, or a fancy house? You want solar panels, a grey water system, and a composting toilet?
No. What you want has nothing to do with the House. (Though these details may help us achieve our goals.)
I think what you want is closer to something along these lines:

I want more free time.
I want more money in my savings account so that I can travel.
I want flexibility.
I want simplicity.
I want to be healthy.
I want to spend more time on interpersonal relationships.
I don’t want to work all the time, I want to relax.

So, What do you really want?

Here’s what I found today:
I was trying to articulate my goals for taking this Permaculture/Ecological Design course. (Talk about it using active, present tense). I just did some free-writing + listing to get started.

– I have the tools to design a building/home in a productive landscape.
– I can design with more than the materials in mind.
– I understand how to actual goals versus superficial goals.
– I can design buildings and homes that interact with the landscape and location.
– I can articulate what makes a successful, functional home.
– I can envision the whole picture.
– I can design for leisure.
– I can design a home with free time in mind and a low-maintenance landscape.
– I can let the goals drive the design process, instead of the details.

I actually couldn’t pick just one that summed everything up, but I think you get the idea. These goal articulations are much more than just “I want to learn about permaculture principles in this class.”

And then I applied this concept to my design process:

I hope this post was helpful to those thinking about designing their own dwellings. If we can establish what it is we really want out of our homes and our lives, the details will fall into place. It can be surprisingly difficult to express what we REALLY want out of our living situations, but I hope this sheds some light on that process!

Tagged , , , , , , , ,

Tumbleweed Tiny House Workshop is right around the corner!

Hey all!

The highly anticipated Tumbleweed Tiny House Workshop in Boston, MA is coming up this weekend. I’ll be speaking at the workshop and doing a little presentation. I’m honored and very excited! (Personal achievement alert: When I applied for field study at the beginning of this semester, I wrote down all of the workshops that I was hoping to attend as a student. Now I get to tell my advisors that I actually guest spoke at those workshops!). I’m going to be speaking about campers as tiny houses, how to save money in your tiny house, solar powered tiny houses, and some other off-grid and eco-friendly systems. I’m excited about all of the other speakers and our special tour of the very FIRST Tumbleweed tiny house! The workshop is led by Derek Diedricksen of relaxshacks.com. You can go to the Tumbleweed website to sign up for the workshop, if you haven’t already.


If you are reading this and are planning on attending the workshop, let me know in the comments!

See you all on Saturday in Boston!


Also, if you’re a tiny house nut like me (which you probably are, and if you’re not you will be soon!) sign up for Derek Diedricksen’s TINY HOUSE SUMMER CAMP! Go over to relaxshacks.com to sign up. It’s a 4 days weekend in July of tiny house fun!! I’ll be bringing the COMET to that one, so you can see her in all her mid-construction glory!


Tagged , , , , , , , ,

Solar Module Placement

Hello again!

I just got some really great questions about the off-grid systems that the COMET will have, and I thought it would be a good time to share some of these infographics and design concepts I’ve been working on.

Where do you put three 185-watt solar modules on a 16 foot trailer with limited surface area?

Here are some of my ideas:


And how do you maximize solar collection when you are parked, and minimize drag when you are driving? See below:


I’ll post some of my rainwater collection system graphics later, which will explain how that whole thing works!

Tagged , , , , , , , , , , , , , , ,

Exterior Paint Design Concept

Good morning!

I’ve been working on some paint schemes for the exterior of the COMET. I think that because I’ll be towing it around so much in the next few months, going to Tiny House Summer Camp With Derek Diedricksen in July, and the KOA vintage trailer rally and sustainable weekend event in Brattleboro, VT, it’s really important I have the outside looking nice and giving people some info about the project.

I love the little stripe details that reference a comet in the seafoam section. I’m also going to put a seafoam colored atomic-looking comet shape behind The COMET text, to tie it all together. I still need to figure out where to put the website and other info.

What do you think? Any suggestions? Let me know in the comments!


Tagged , , , , , , , ,

Marmoleum Click flooring SketchUp model

Hello!

Yesterday I received my pallet full of goodies from the wonderful Green Building Supply. I got the UltraTouch denim insulation (which is so soft and squishy I want to make a bed out of it), lots of no-VOC paint for the interior and exterior, and my Marmoleum Click flooring! I’m really excited about the Marmoleum flooring – it’s antimicrobial, all natural, and really nice to step on. I know the flooring doesn’t go down until everything else is done, but I made up these models in SketchUp so I would know exactly how to lay out each panel (the Marmoleum I got comes in 12″ x 36″ planks).

I chose the black (“Lava”) and white (“Arabian Pearl”) because I felt like it would go with whatever color scheme (or lack there of, haha – I like to mix and match whatever I can find) I choose for the interior. I also think it’s a nice nod to the past, as many vintage campers had the classic 50’s-style black and white checkered linoleum floors. This design is a modern, updated version of those classic black and white tiles!

…………………………………………………………………………………………………………

Oh, and here’s a teaser for the DIY vacuum form table step-by-step DIY project, which is coming to CometCamper.wordpress.com very soon! It’s taking me a little bit to get the instructions and materials list together, because I’ve been so busy out in The COMET working every day, but a full DIY guide is on it’s way, I PROMISE!

That’s me, cutting out the frame for the plastic. Photo credit + moral support credit: Matt Carroll. Thanks, buddy!

Tagged , , , , , , , , , ,

Thank You TIMBUCKTU RV!!

What a wonderful surprise! I came across an outdated catalog for Timbucktu RV in Worcester, MA that my father had given me when I started getting into vintage trailer restoration, and found that the catalog had ALL of the camper parts that I needed to replace in The COMET. I picked out a few things in the catalog and called Timbucktu RV in Worcester, explaining my project and what parts I was missing. They said I should come on down to the store and see what I could find that I needed. I ended up leaving with everything I needed to begin repairs on the COMET. The people at Timbucktu RV are so helpful and friendly, and engaged with the project, which was wonderful. I got lots of good advice from the people at Timbucktu RV, who have been repairing campers, motorhomes, and trailers for many years. The store and catalog both have a GREAT selection of parts – hitches, jacks, lights, even water tanks and toilets – all the larger items that not all RV stores stock in their stores. It was great to be helped by a person that new what they were selling and understood what I was trying to do with The COMET, as opposed to guessing what I needed and ordering it online, hoping that it would be the right part when it got here. Timbucktu RV has experience in all things camper related, and they even have a couple of vintage Airstreams on the lot. I fell in love with a little Globetrotter in the parking lot. They also have an extremely rare vintage Airstream diner, complete with glittery vinyl seating and bar. It’s one of 8 ever made. It was gorgeous! They literally have everything under the sun camper-wise, and every part you could ever want – new or retro. And all of the appliances that they offer would be ideal in a tiny house on wheels! I now have a new jack, roof coat, a rocket hand-pump faucet, a new inlet, replacement teardrop running lights, a solar-powered vent fan, and about a dozen other things I needed, thanks to Timbucktu RV (1047 Southbridge Street, Worcester, MA)! Timbucktu is in the process of moving their inventory and getting a new website, so when that gets updated I will add that information as well! For now, please call 508-459-1132 for a catalog.

Thank you Timbucktu RV, for your amazingly generous contribution to The COMET!!

Tagged , , , , , , , ,

Simple Solar Showers for Summer

Good Morning!

Last night I perused the web for the best, simplest solar shower devices on the market. I was looking for something affordable and convenient. The COMET doesn’t have room for a shower inside, so she will have a solar shower outside, with some sort of portable, collapsible, privacy shower set up that I can pop up behind the camper (I like the idea of a little teak platform with a circular curtain rod made of metal piping that can break down easily when I’m on the move, and some sort of hook to hang the solar shower on once it is heated up).

Here are my favorite finds from the my solar shower research!

Summer Shower 5, $25 on Amazon.com

This 5 gallon solar shower is a new spin on the traditional black bag camp shower that you hang from a tree. It absorbs tons of radiant heat from the sun, and has a nifty little simple thermometer to let you know how hot the water is. This little added technology makes this the best cheap solar shower. It got great reviews, as well.

Pump-Up Solar Shower, $40 + $15 shipping, Duckworks Boat Builders Supply

I love this idea for a solar shower. Because it pumps up, it has more water pressure than the gravity fed bag shower. I saw DIY instructions for a solar shower like this, using a garden sprayer painted black and a shower nozzle of your choice, but when I priced it out, the individual parts to make my own were more expensive than this one! This one is meant to be more like a real shower than the camp bag shower. It’s a nice option for a solar shower, and perhaps the one I’ll end up with!

DIY Gravity-Fed Hose Coil Solar Shower, price varies, DIY

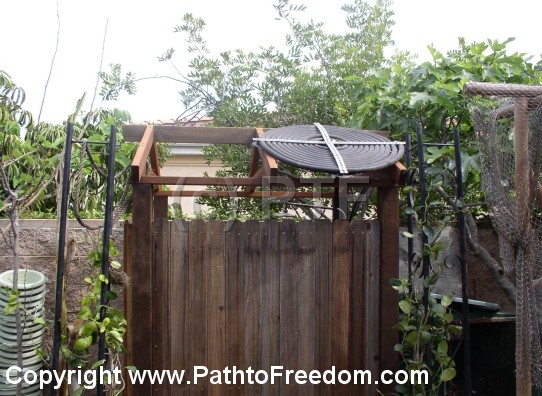
This solar shower is the most permanent and labor intensive on this list. You can use either black garden hose or flexible black piping, coil it into whatever shape fits your space, and voila! The advantage of this coil solar shower is the increased surface area (as compared to the ones above), which means that the water will heat up much faster (20 minutes as opposed to 2-3 hours for the bag/tank systems). I am hoping to eventually build one of these for The COMET, and either have it be able to break down and be portable, or have it attached to a frame on the back side of the camper, which can flip down when I’m mobile, and flip up into a shower stall when I’m parked!

…………………………………………………………………………

Also, I built a vacuum form yesterday! I built the vacuum form so that I can vacuum mold my own custom urine diverter for my small-space composting toilet (which is also turning into a squatting toilet!). The vacuum form is totally portable, so that I can bring it to workshops, do demos, and show people how easy it is to make your own urine diverter for cheap! I’ll post pictures and a full DIY step by step guide later, but for now it’s out to the driveway to work on The COMET. I have lots to do in the next few weeks!

Tagged , , , , , , , , ,